Monday, November 28, 2016

elf on the shelf ideas

I love Christmas time! Teaching made it even better. I loved being around excited kiddos that help spread the Christmas spirit. I'm not quite ready to start the elf with Elle, so I thought I would share some ideas from when I used The Elf on the Shelf in my classroom.

He started out on our Christmas tree with his book wrapped underneath. My students loved it! We named him Elfis. Here are some places that he decided to hide throughout the month.

The reading room with a book of Christmas jokes.

Making snowflakes by the school supplies.

Making snowflakes by the school supplies.

Dressed up like Harry Potter flying on his paintbrush.

Playing Candyland with Mr. Sock Monkey.

Hanging around the lunch count.

Some students were getting a little stinky and were choosing not to believe. Elfis didn't like that and decided to take their pencils for a dive.

 He also helped keep the classroom clean.

Elfis was so loved in our classroom that the students even made things for him.

Needless to say, it was a great way to add a little fun to the Christmas season, and it was also a great classroom management tool. I can't wait to start this tradition with Elle! Next year she should be a lot more into it.

Friday, November 25, 2016

metallic geometric ornaments

I love adding something new to my Christmas decor every year. This year was no exception. I try to get a little creative so I don't break the bank. Here's what I came up with: 
                                             
                                               
I love how it's different than the usual ornaments you find. It was also very easy to make, which is always a bonus.

                                             
To make these ornaments you need cocktail straws (you can find them in the paper goods section at the store (I bought mine on Amazon)), 30 gauge wire, and some spray paint (metallic works best because it makes the ornaments look like they are made out of metal tubes instead of straws).


You'll need about 4' of wire and twelve 2.5" straws (I had to cut mine in half).


Thread the straws on the end of your wire and connect them by twisting your wire.


Add two more straws and connect them to a corner from your first triangle.

                                                
Add two more straws and connect them to the previous triangle.

 
Repeat that two more times until you have five triangles in a row.

   
Add one more straw and connect the straw with the far corner. This will make a pyramid with two flaps.

                                
Feed your wire though one of the straws on a flap so it is coming out of the point.

                                                 
Connect the flaps together and you have a diamond! Using your extra wire create a loop to hang your ornament from and spray paint. Easy peasy!


Monday, November 21, 2016

cookie "salad"


Asked to bring a salad or dessert? You could just bring both. We jokingly refer to this recipe as a salad because it has fruit in it, but let's be real. It will put you in the  creamiest coma you've ever known. It is a fan favorite, and I always leave with an empty bowl. You better believe it will make its appearance at Thanksgiving dinner.


Cookie Salad 


Ingredients 

1 package fudge striped shortbread cookies (broken into large chunks)
1 lb strawberries (sliced)
2-3 bananas (sliced)
1 small can Mandarin oranges
1 cup buttermilk 
1 small package vanilla pudding 
1-16 oz container Cool Whip 

Instructions 

Whisk the buttermilk and dry pudding mix together. Fold in the Cool Whip. Slice up strawberries and bananas, and add to  creamy mixture. Drain the can of Mandarin oranges and crush the cookies with your hands (you'll want big chunks). Add the oranges and cookies to the salad and carefully mix it all together. Enjoy!

Tuesday, November 15, 2016

project life: how to make a scrapbook page on your phone

Yesterday I mentioned my love for the Project Life app. It is my favorite way to document my family photos. I wanted to do a follow up post showing how simple it is to use. I will be showing you screenshots from my IOS phone. I'm not sure if they have an app for Android devices, but I know they are working on it.


When you open the app you will have the option to make a collage, create a page, look at your past projects, ask a question, or order prints. In this post will will be focusing on the blue quadrant, making a page.


The first thing you will need to do is pick a layout and a color pallet. To choose a color pallet, tap on the button at the top left (with three horizontal lines). You can also change the color of the background of your page.


When you tap on a square in the layout you have the option of placing a picture or a filler/journal card. The photo button will take you directly to your phone's photo gallery.


The filler card button will bring you to the card kits you have. You will receive a few free ones automatically, and the rest average between $0.99 to $1.99.  You do not need to use the same kit for each filler card on a page. You can mix and match if you would like.


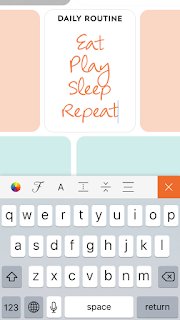
The journaling card will give you the option to add text. You can manipulate the text in various ways. You can change the text color, font, size, line spacing, vertical offset, and justification.


Once your page is completed it will automatically save to the app. One danger to this is that if you lose the app, you lose your pages. Knowing this, you will most likely want to back up your pages on your computer or other cloud device. When you are ready, you can either choose to print through Project Life, or export the image and send it to another printing company. As of now, Project Life charges $1.99 for each 12x12 page with a flat $5.00 shipping fee. I love this new way to scrapbook. It has been a serious game changer for me. If you have any more questions on the Project Life app they have a bunch of tutorial videos on YouTube.

Monday, November 14, 2016

project life: everything you need to know about the app


Scrapbooking. Am I the only one that feels pressure to document my family's life through scrapbooks? I started young. I used colored paper, scissors, and glue to organize the photos my mom took of me. I loved it. I had a blast being creative and making each page look special. It was so time consuming, and messy though. Oh, the mess. Scraps of paper everywhere and sticky fingers from the glue sticks. As a mom, I feel it is my duty to keep track of my family's comings and goings. That is partially what this blog is for, but I want something more concrete. Something I can hold in my hands.

The heavens shined down on me the day I discovered Project Life. I had heard of it many times from friends, but I never looked into it. It seemed like a good idea, printing out your pictures, buying their filler cards, and stuffing them all in a page protector. The problem was it still took time, and it felt like a nightmare to print off all the photos off my phone. The magic was when I discovered the Project Life app. Could I really create all of my scrapbook pages on my phone? Yes, yes I could.


On the app you can pick from different layouts, add the photos from your phone, and dress it up with filler cards and text. You can also order the prints directly from your phone as well, or you can export the image and order the prints from somewhere else. If you order the prints directly from Project Life it will cost you $1.99 for each 12x12 print and a flat rate of $5 for shipping. I was curious on the print quality if  I ordered through Project Life. I was pleasantly surprised. I received my prints within a week, and they were all printed on high quality photo paper. I have dubbed this my new form of scrapbooking. I love the ease without having to take away the quality or look of the product. Check out my post on how to use Project Life.

I am in no way affiliated with Project Life. I simply love the product and wanted to share it with others.

Friday, November 11, 2016

pita pizzas


Elle loves pizza, or ask she would say, "za-pee." To be honest, Mister and I love za-pee also. These pita pizzas are the perfect solution for those nights that you don't want to make homemade pizza, or spend the money on ordering out. The nice thing about these pizzas is that everyone can make their pizza to their specifications. Mister always wants white sauce, and Elle wants red. I bounce back and forth on which sauce I want.


Pita Pizzas


Ingredients

Pita bread
Pizza sauce
Mozzarella cheese
Toppings of your choice

Instructions

Preheat oven to 350 degrees. Place pitas on a baking sheet and create your desired pizzas. Bake for 10-12 minutes, or until cheese is melted. I like to broil ours for a few minutes after to brown the crust and cheese. Enjoy!

Thursday, November 10, 2016

garlic knots


The other night I offered to bring a neighbor dinner since she broke her leg, and was having a hard time getting around. I made my lasagna recipe, garlic knots, and Caesar salad. I decided to make double, so we could have the same meal. While you're making a mess you might as well get the most out of it, right? As I was working on the meal I received a text message from a friend saying her sweet three-year-old broke her leg clean through. It had been quite a day for them, so I decided to make our dinner their dinner. It was a quesadilla night for our family. The next day my friend informed me that the garlic knots were the only thing she could get her daughter to eat, and asked for the recipe. These garlic knots are the easiest and most delicious side to any pasta dinner. All you need is Rhodes rolls, melted butter or oil, and garlic seasoning. My absolute favorite garlic seasoning is  Johnny's garlic spread that you can get at Costco. It is the perfect blend!

Garlic Knots


Ingredients

12 Rhodes rolls
1/4 cup melted butter
Garlic seasoning
Garlic salt (optional)

Instructions

Set out the desired amount of frozen roll dough, and allow to defrost. You just need them to be soft enough that you can mold them. When the dough is soft, mold each roll into a breadstick and then tie into a knot. Place each knot on a nonstick or greased baking sheet. Let them rise for about a half hour. Preheat oven to 400 degrees. In a microwave-safe bowl, melt the butter. Brush half of the butter on the dough, and save the rest for when they come out of the oven. Bake the knots for 10-12 minutes, or until golden brown. Immediately after removing them out the oven brush remaining butter on top and sprinkle desired amount of garlic seasoning and salt. Enjoy!

Wednesday, November 9, 2016

the day donald trump was elected president of the united states of america


I remembered the night of the first presidential debate. I was at my in-laws' house, and my father-in-law had it on the television. I remember the shock I felt when I saw Donald Trump on the stage. I literally asked aloud, "He isn't really running for president, is he?" My dad would watch "The Apprentice" all the time. I thought he was such a jerk on that show. I thought his daughter had absolutely no personality. I also remember seeing Hillary Clinton on the stage for the debate. I thought to myself, "She might actually win. We might have a woman president." At first I was excited at the idea, then I saw her platform and her background. I immediately became terrified to have her as America's first woman president. I didn't want her to be the face of the American women with no morals and no conscience.

I know I'll make a lot of people mad by saying this, but I feel as though America made her bed, and now she needs to lie in it. According to Glenn Beck, 60 percent of Trump voters didn't like the fact that they were voting for him, and 54 percent of Clinton voters didn't like that they were voting for her. Why would American citizens use their voting power to vote for someone they don't like? To despise the other? Out of fear of the other candidate? If we would have voted for the candidate we deemed the most worthy of presidency we would have had something very different to watch last night.

There are a lot of upset Americans today. The truth is, if a high percentage of Americans were willing to vote for Donald Trump just to keep Hillary Clinton out of the White House you have to see that reflect on her as a candidate. I have no fear, however. America is strong. If we can survive two years shy of a decade with Barack Obama at the head, we can make it through four years with Donald Trump. We live in a country with many checks and balances, and for that I am grateful.

Wednesday, November 2, 2016

chicken bacon ranch pasta


I love Alfredo. I love chicken. I love bacon. I love ranch. When I came across this recipe on Damn Delicious I knew it was for me. It was so good. My husband loved it, and requested for it to be added to our regular meals. I used a different Alfredo sauce recipe than the website used simply because I didn't have heavy whipping cream on hand. You could probably use bottled Alfredo sauce instead if you were feeling lazy.


Chicken Bacon Ranch Pasta


Ingredients

4 slices of bacon diced (I just used bacon bits)
2 boneless, skinless chicken breasts, cut into 1 inch chunks
1 Tbsp olive oil
1 Tbsp Ranch Seasoning and Salad Dressing Mix
8 ounces rotini
Mozzarella cheese
Alfredo sauce (I halfed this recipe)

Directions

Head over to Damn Delicious for the baking instructions. You can use their Alfredo recipe instead of the one I linked if you prefer. Enjoy!

Tuesday, November 1, 2016

dollar store gold vase tutorial


Gold is my thing. I love adding a pop of gold anywhere I can. These gold vases are the perfect touch to any room. I cannot wait to use these as part of my tablescape for Thanksgiving dinner. I think they will look absolutely gorgeous with some fresh flowers lining the middle of the table. It's hard to believe, but you can make this vase using the clear glass bowls at the Dollar Store in the floral section. You can make a gold vase just like this for a dollar and a bit of spray paint.


Small Gold Vase


Materials

Clear glass bowl (from the Dollar Store)
Primer spray paint
Gold metallic spray paint

Directions

Place the clear bowl bottom up on some cardboard or other surface you would like to paint on. Spray the bowl with a primer. Spray about 10" away from the bowl and use many light coats instead of one thick coat. This will help insure that the paint dries evenly and that it won't drip. If the paint does drip, wait for it to dry, and sand it a bit to smooth it out. Once your primer has dried, turn to bowl right side up, and make sure the top and rim of the bowl has primer on it as well. Once it dries again, turn the bowl back over and repeat the steps with the gold spray paint. Be sure your paint has sufficient time to dry before using the vase. Your can of spray paint will say on the back how long it takes to fully dry.


*Gold vases are not safe to handle food.*