When you open the app you will have the option to make a collage, create a page, look at your past projects, ask a question, or order prints. In this post will will be focusing on the blue quadrant, making a page.
The first thing you will need to do is pick a layout and a color pallet. To choose a color pallet, tap on the button at the top left (with three horizontal lines). You can also change the color of the background of your page.
When you tap on a square in the layout you have the option of placing a picture or a filler/journal card. The photo button will take you directly to your phone's photo gallery.
The filler card button will bring you to the card kits you have. You will receive a few free ones automatically, and the rest average between $0.99 to $1.99. You do not need to use the same kit for each filler card on a page. You can mix and match if you would like.
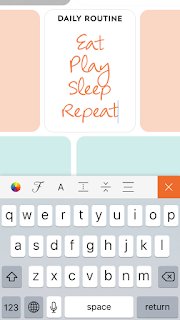
The journaling card will give you the option to add text. You can manipulate the text in various ways. You can change the text color, font, size, line spacing, vertical offset, and justification.
Once your page is completed it will automatically save to the app. One danger to this is that if you lose the app, you lose your pages. Knowing this, you will most likely want to back up your pages on your computer or other cloud device. When you are ready, you can either choose to print through Project Life, or export the image and send it to another printing company. As of now, Project Life charges $1.99 for each 12x12 page with a flat $5.00 shipping fee. I love this new way to scrapbook. It has been a serious game changer for me. If you have any more questions on the Project Life app they have a bunch of tutorial videos on YouTube.


No comments:
Post a Comment